SAML Setup on On-Prem Cluster
This guide explains how to configure SAML authentication for the Traceable Platform on-premises deployment.
What is SAML
SAML (Security Assertion Markup Language) is mostly used as a web-based authentication mechanism because it relies on using the browser agent to broker the authentication flow.
SAML Authentication Flow
At a high level, the authentication flow of SAML looks like this:
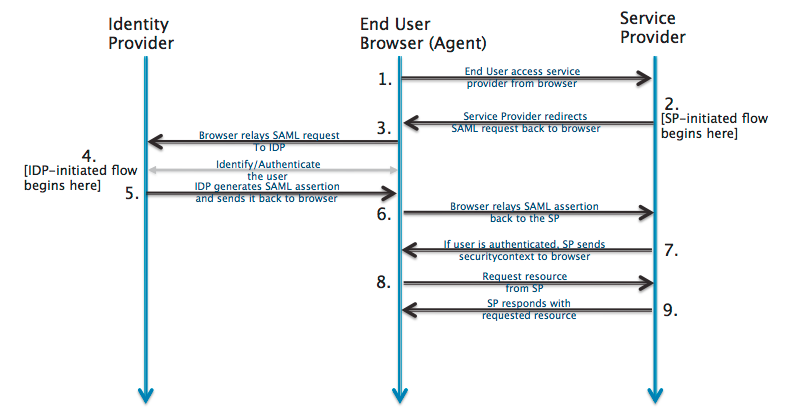
Key Points:
- The SP (Service Provider) never directly interacts with the IDP (Identity Provider). A browser acts as the agent to carry out all the redirects.
- The SP needs to know which IDP to redirect to before it has any idea who the user is.
- The SP doesn't know who the user is until the SAML assertion comes back from the IDP.
Reference: Okta SAML Documentation
Prerequisites
Before configuring SAML, ensure you have:
- Access to the Traceable Operator UI
- Access to Keycloak admin console
- Access to MongoDB for tenant configuration
- SAML metadata from your Identity Provider (IDP)
- Admin access to your SAML Identity Provider
Configuration Steps
Part 1: Keycloak Configuration
1. Login to Traceable Operator
Navigate to your Traceable Operator:
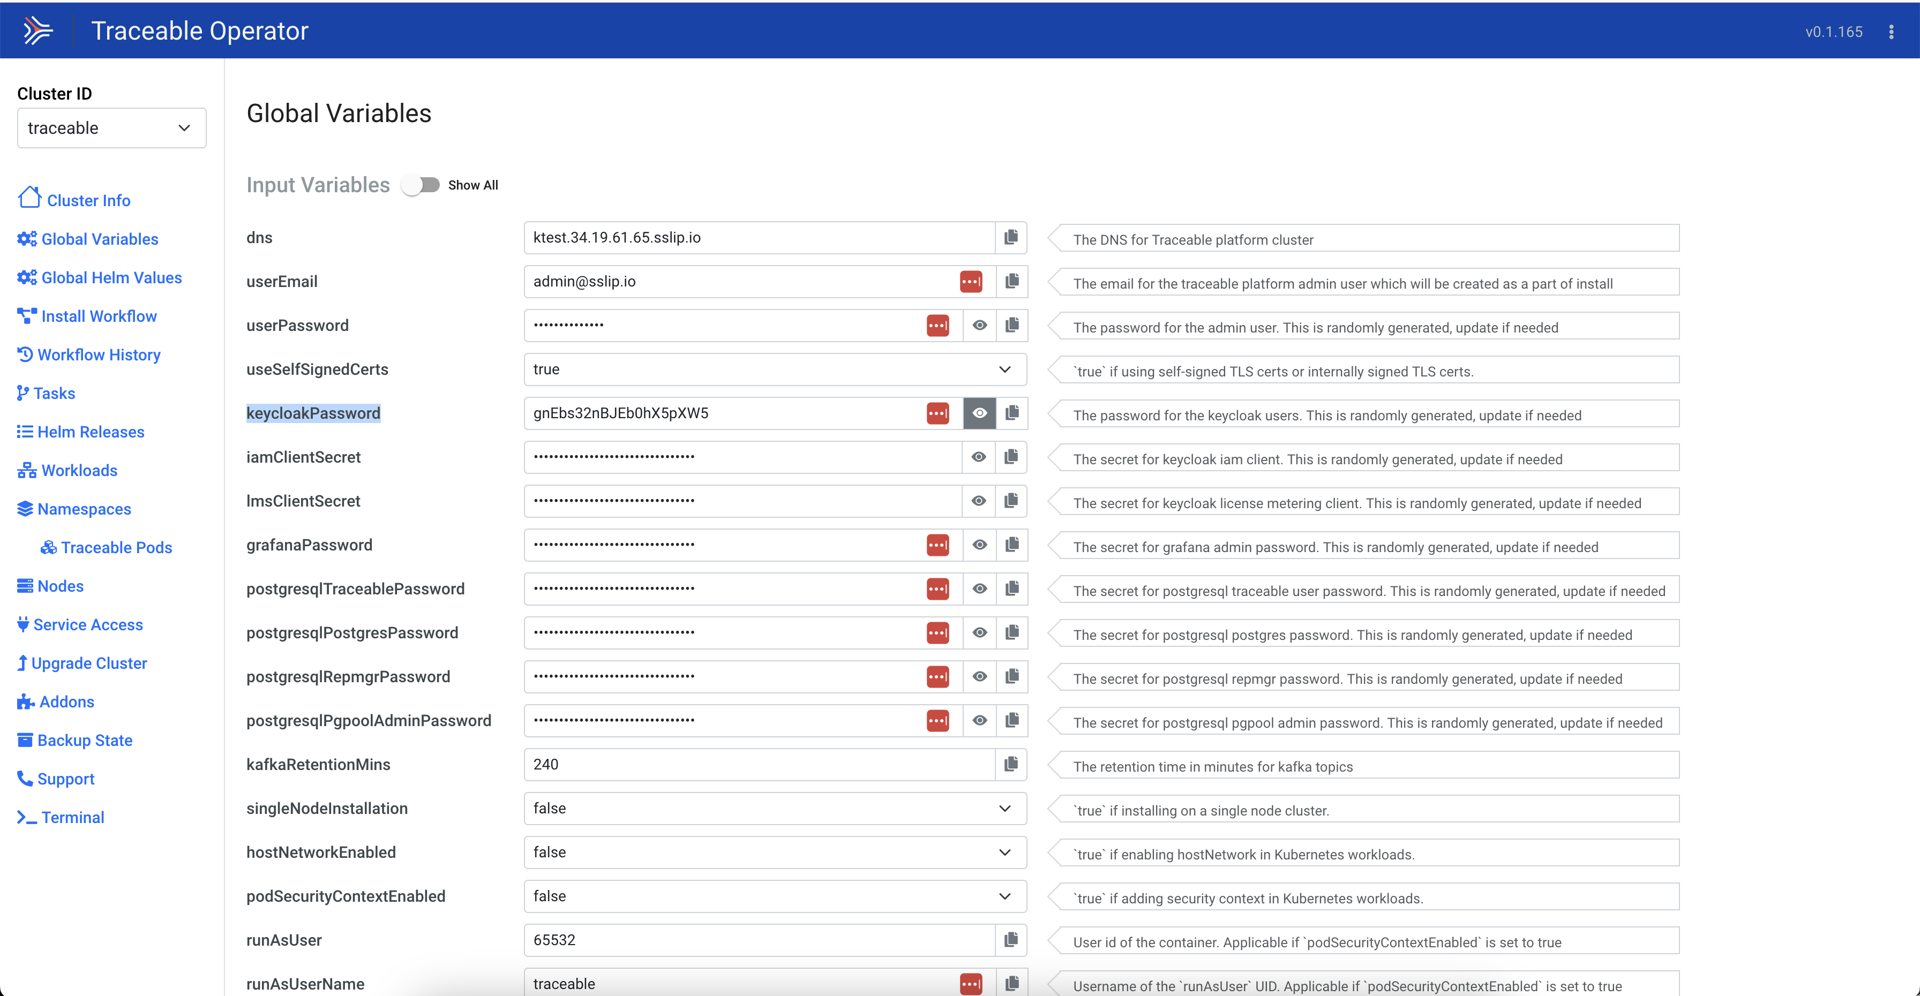
2. Get Keycloak Password
- Click on Global Variables
- Copy the keycloak password
3. Login to Keycloak
Navigate to Keycloak:
Enter credentials:
- Username:
keycloak - Password: (copied from step 2)
4. Access Identity Providers
- Select Traceable from the dropdown list
- Click on Identity providers
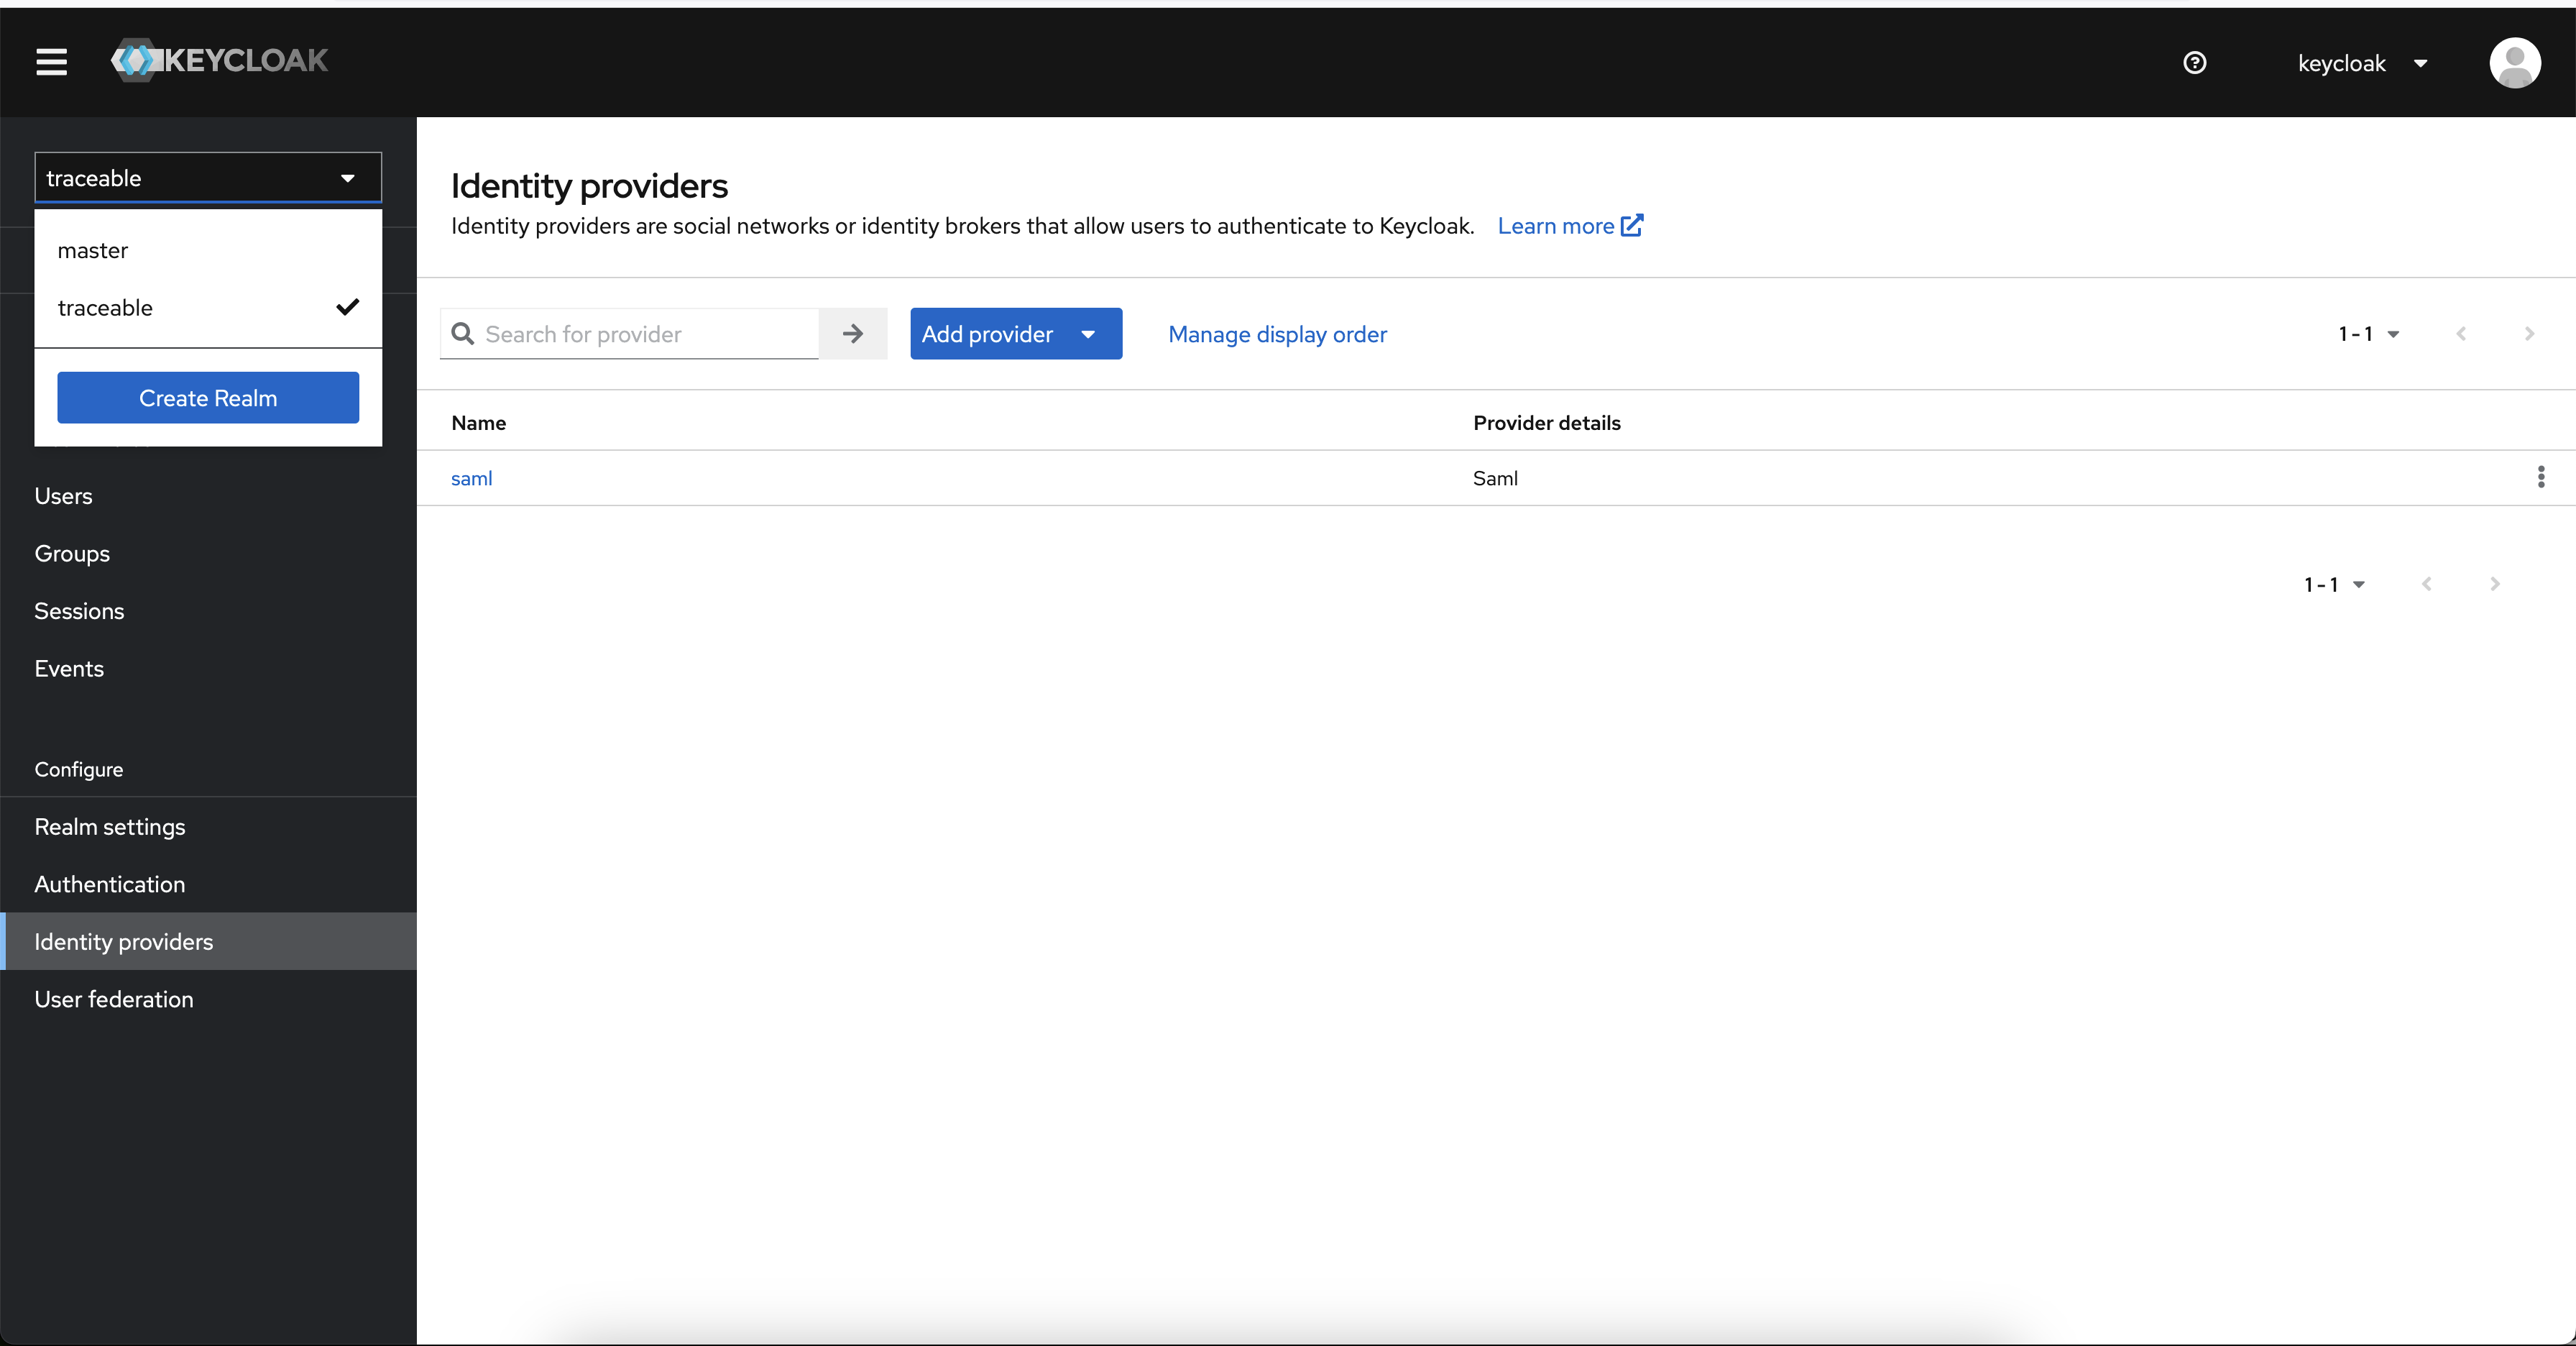
5. Add SAML Provider
- Expand Add Providers list
- Select SAML v2.0
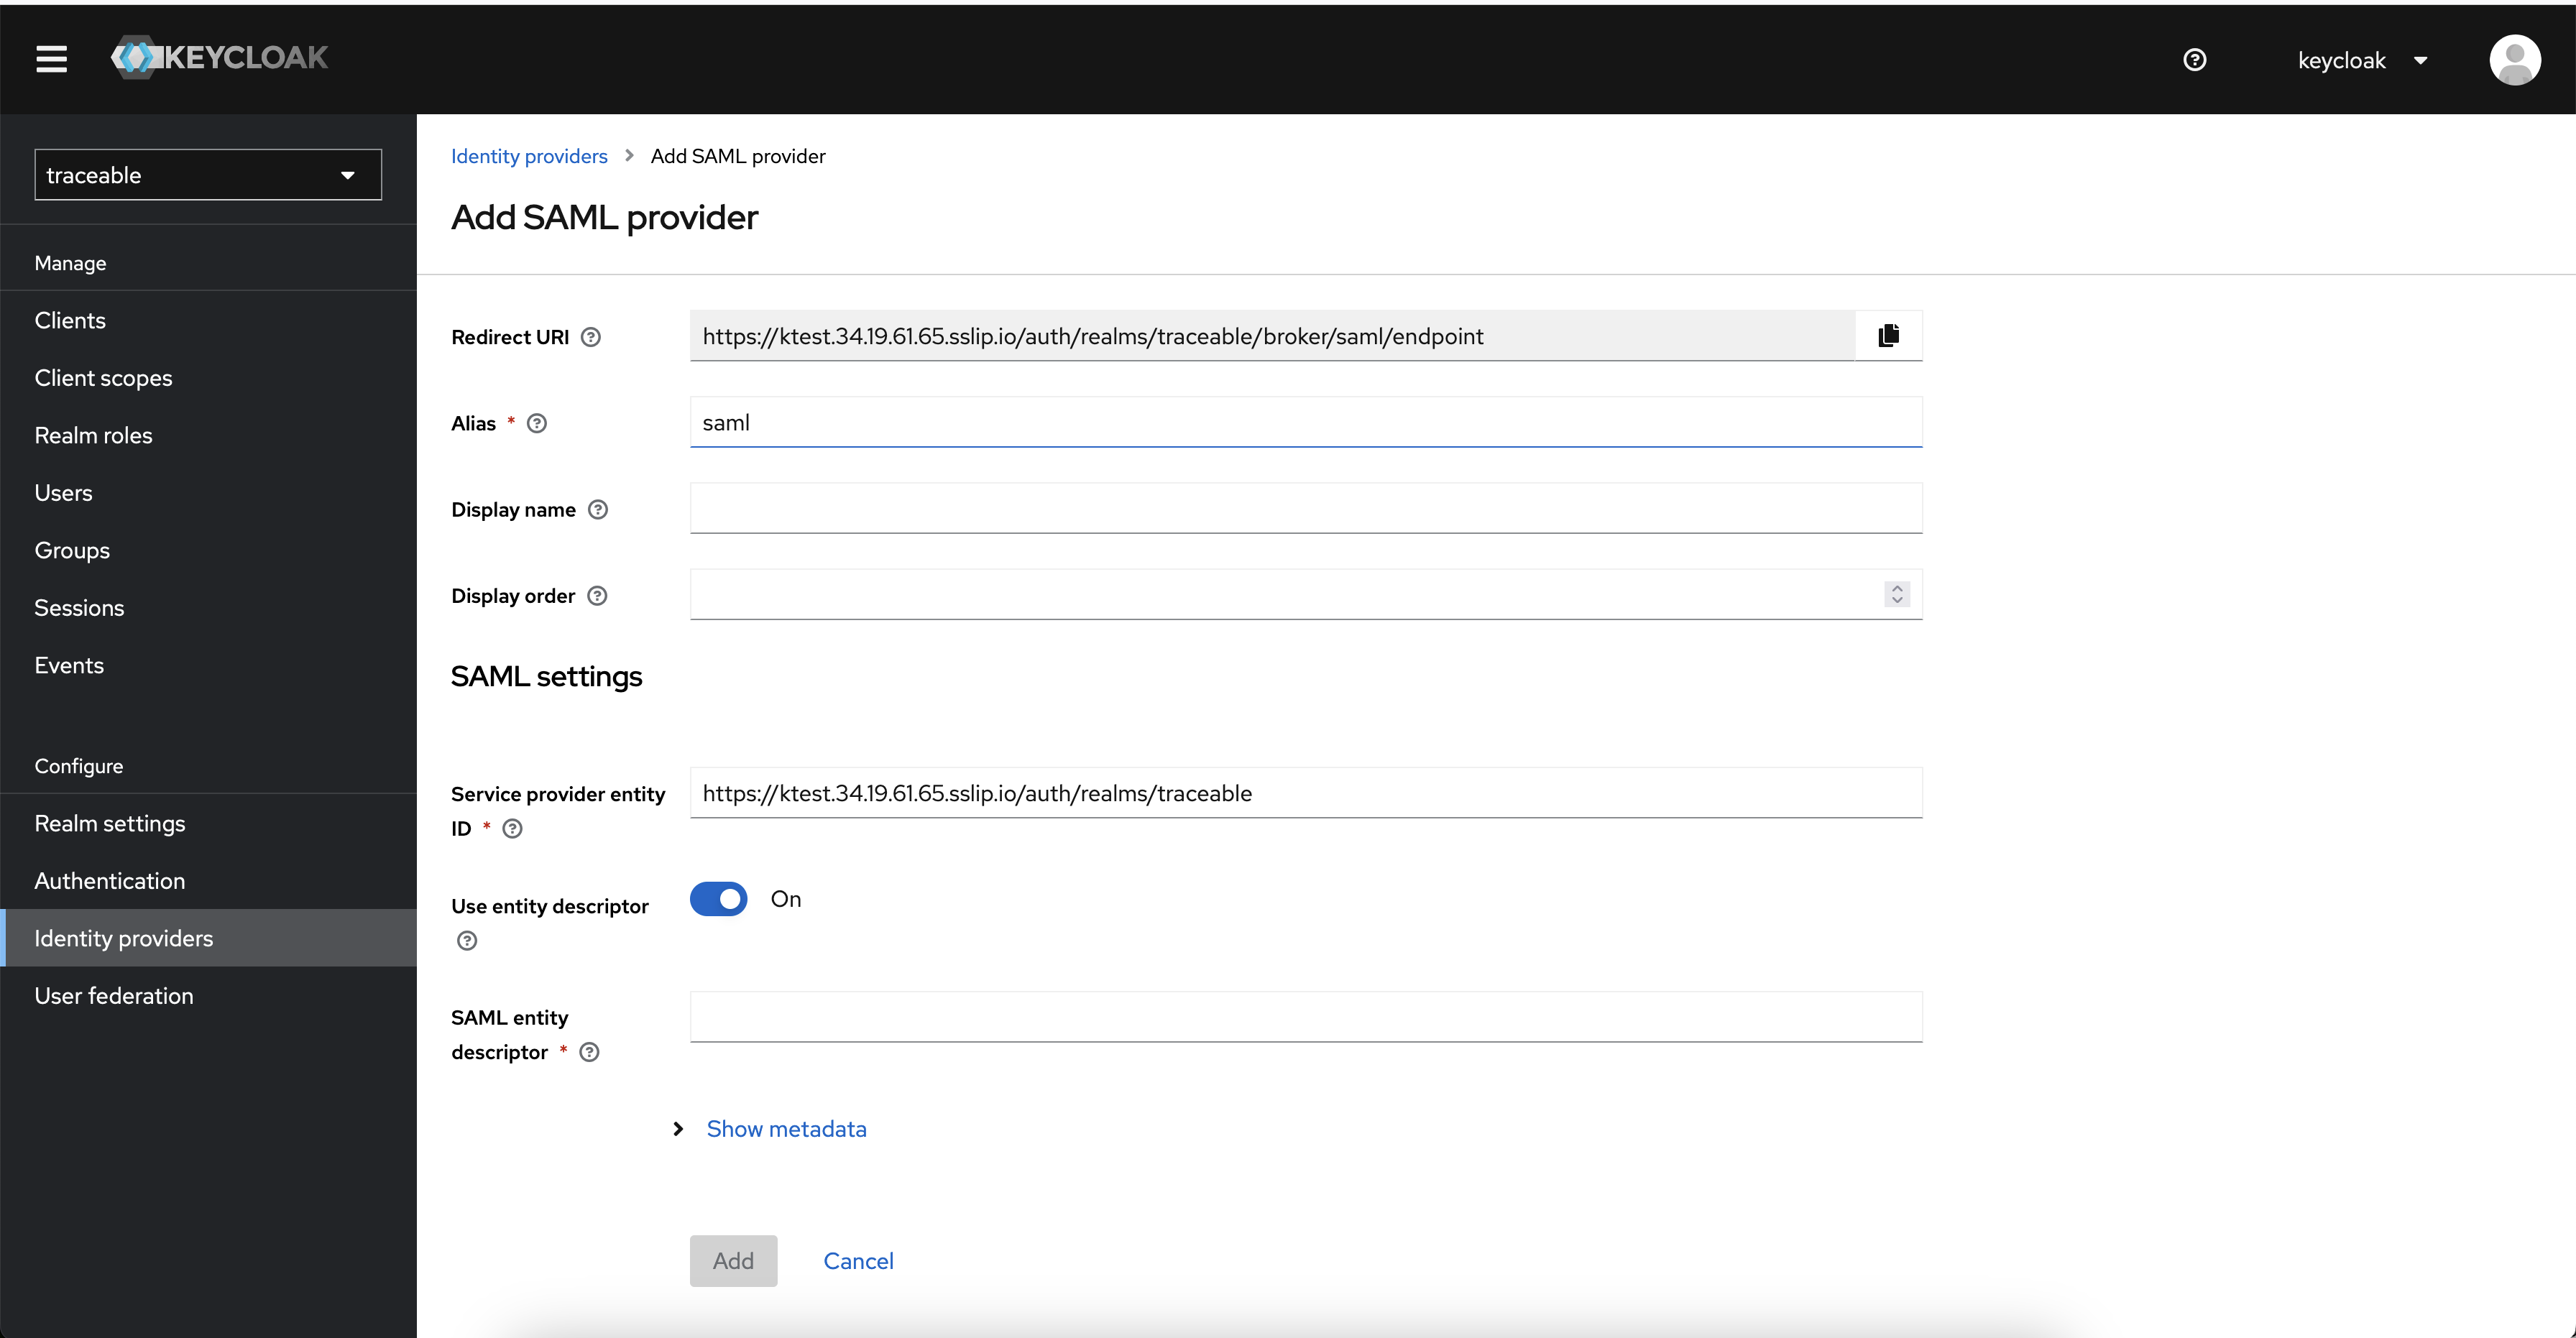
6. Get Redirect URI
Copy the Redirect URI displayed on the screen. You will need to share this with your SAML team.
Example Redirect URI:
7. Obtain SAML Metadata
Your SAML team will provide either:
- Metadata URL, or
- Metadata XML file
Example Metadata XML:
<?xml version="1.0" encoding="UTF-8"?>
<md:EntityDescriptor entityID="http://www.okta.com/exkm17y10zPSgDDNE697" xmlns:md="urn:oasis:names:tc:SAML:2.0:metadata">
  <md:IDPSSODescriptor WantAuthnRequestsSigned="false" protocolSupportEnumeration="urn:oasis:names:tc:SAML:2.0:protocol">
    <md:KeyDescriptor use="signing">
      <ds:KeyInfo xmlns:ds="http://www.w3.org/2000/09/xmldsig#">
        <ds:X509Data>
          <ds:X509Certificate>MIIDqjCCApKgAwIBAgIGAZNyZ1xNMA0GCSqGSIb3DQEBCwUAMIGVMQswCQYDVQQGEwJVUzETMBEG...</ds:X509Certificate>
        </ds:X509Data>
      </ds:KeyInfo>
    </md:KeyDescriptor>
    <md:NameIDFormat>urn:oasis:names:tc:SAML:1.1:nameid-format:unspecified</md:NameIDFormat>
    <md:NameIDFormat>urn:oasis:names:tc:SAML:1.1:nameid-format:emailAddress</md:NameIDFormat>
    <md:SingleSignOnService Binding="urn:oasis:names:tc:SAML:2.0:bindings:HTTP-POST" Location="https://idp.example.com/sso/saml"/>
    <md:SingleSignOnService Binding="urn:oasis:names:tc:SAML:2.0:bindings:HTTP-Redirect" Location="https://idp.example.com/sso/saml"/>
  </md:IDPSSODescriptor>
</md:EntityDescriptor>
8. Configure SAML Entity Descriptor
Option A: Using Metadata URL
- Enter the metadata URL in the SAML entity descriptor text box
- Click the Add button
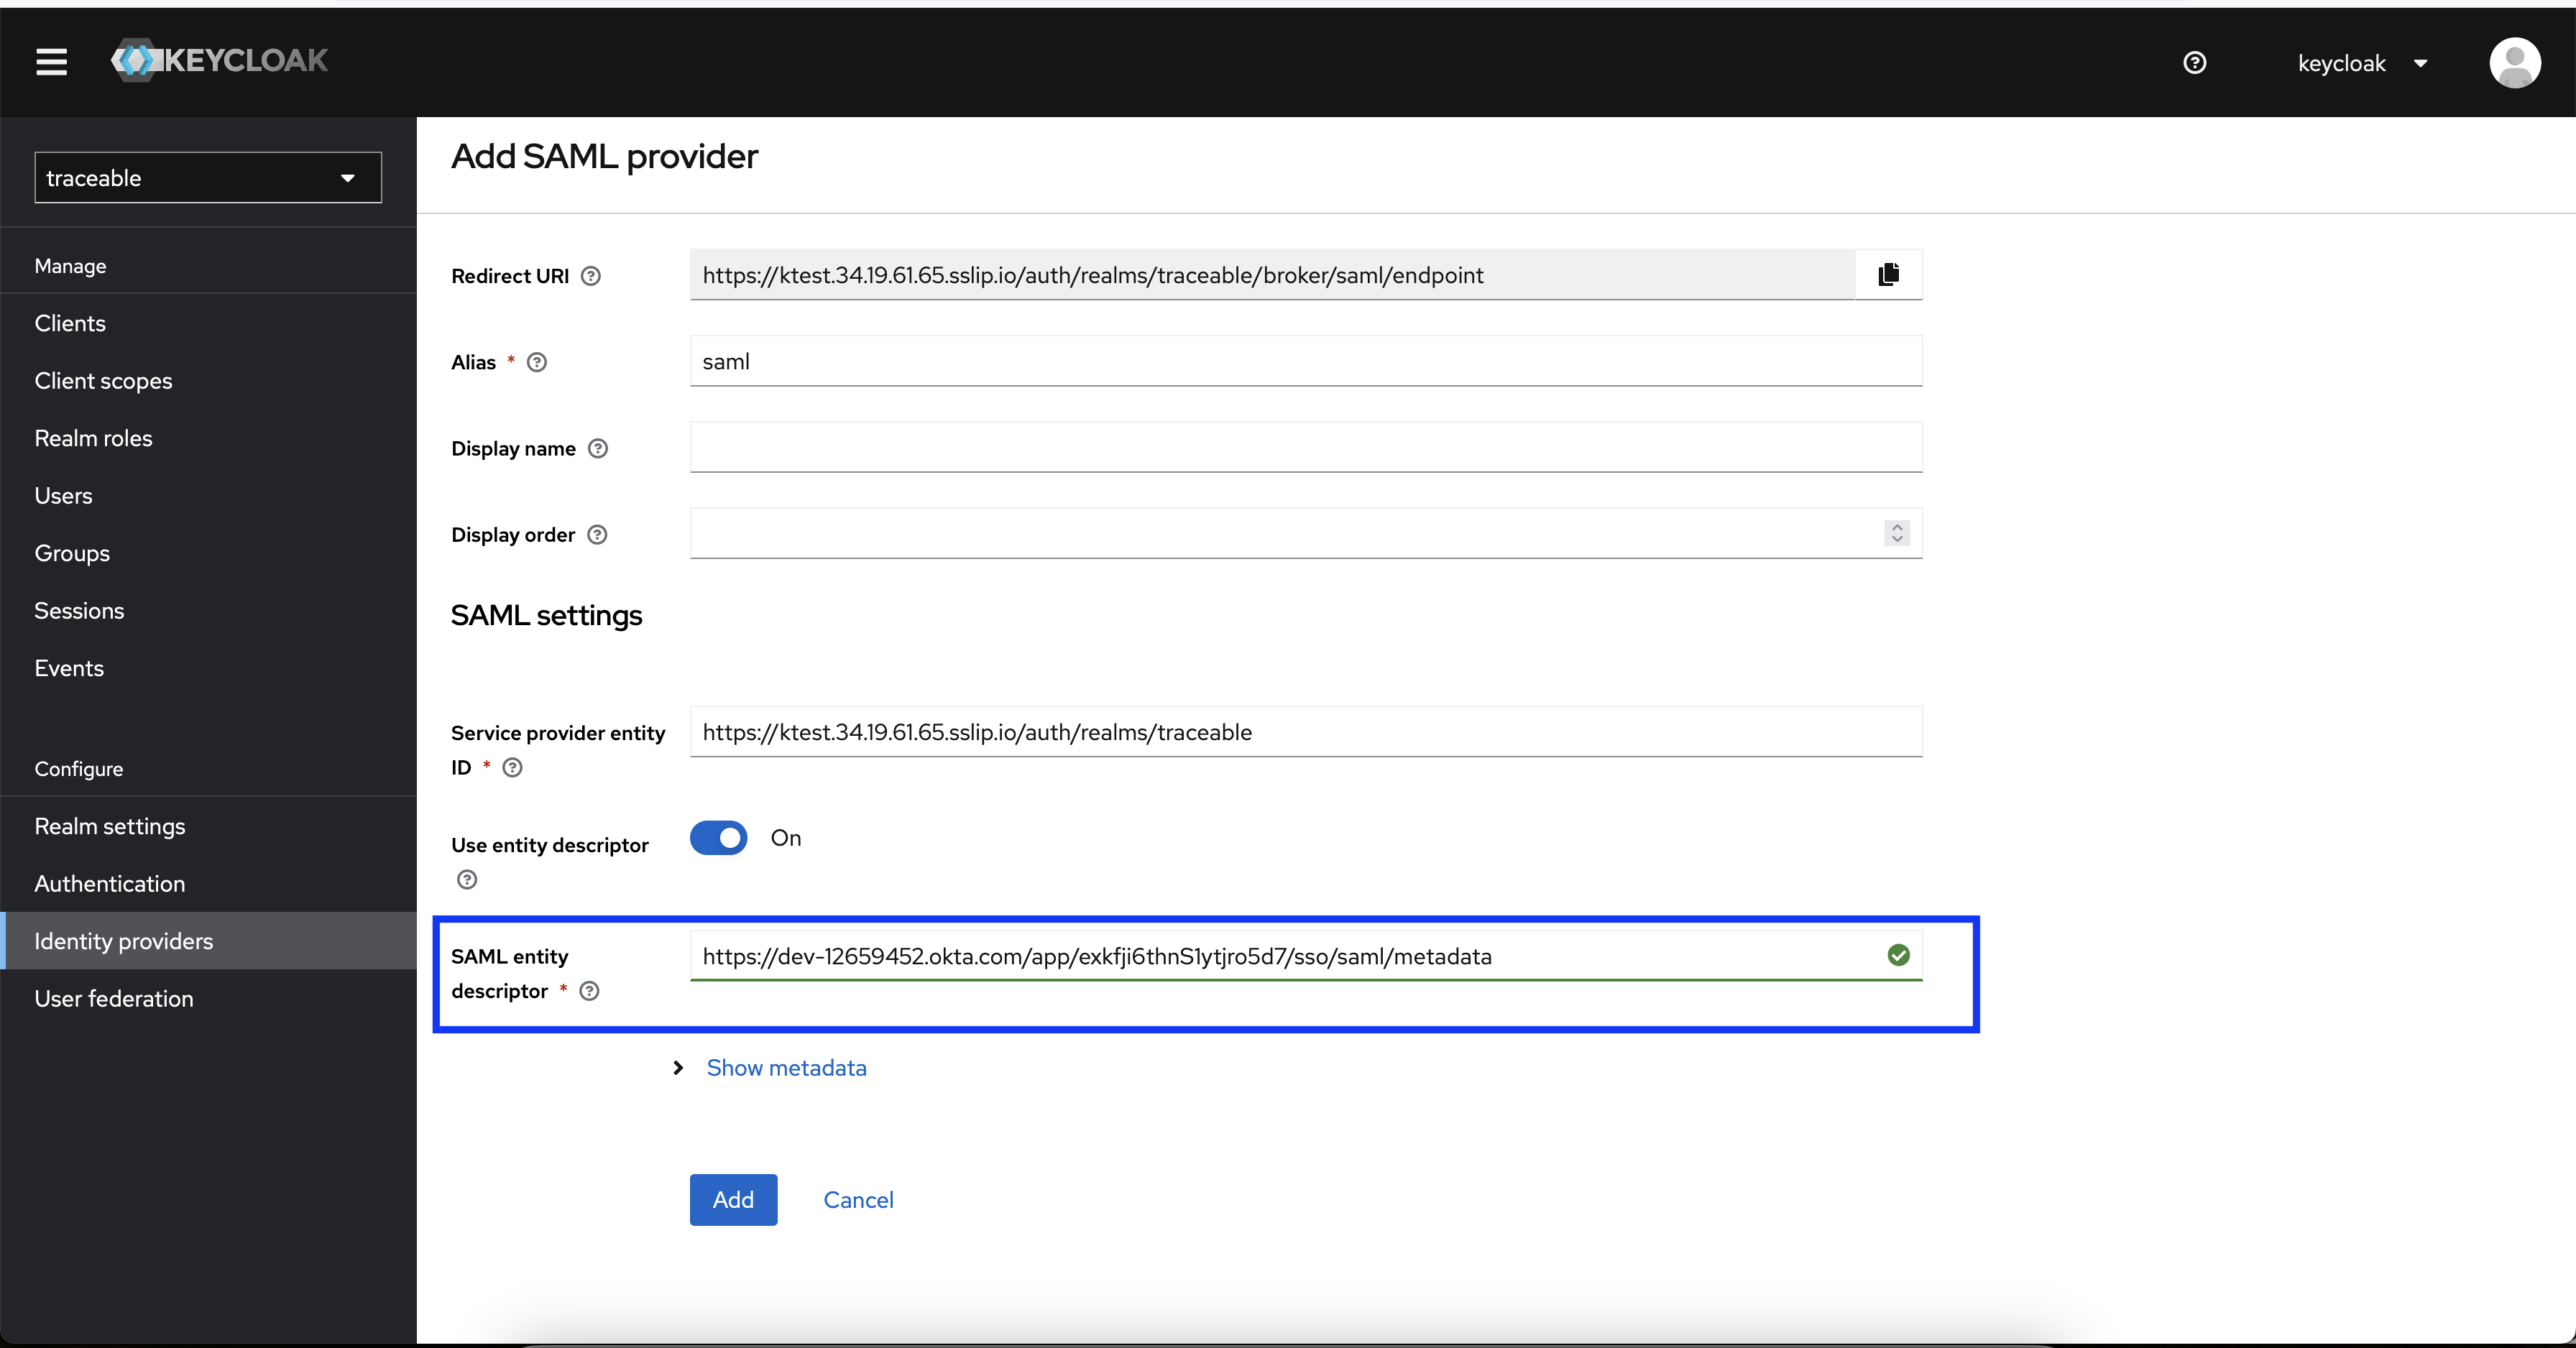
Option B: Using XML File
- Deselect Use entity descriptor
- Upload the XML file provided by your Identity Provider
Important: Remove any value for Single logout service URL if present.
9. Configure Attribute Mappers
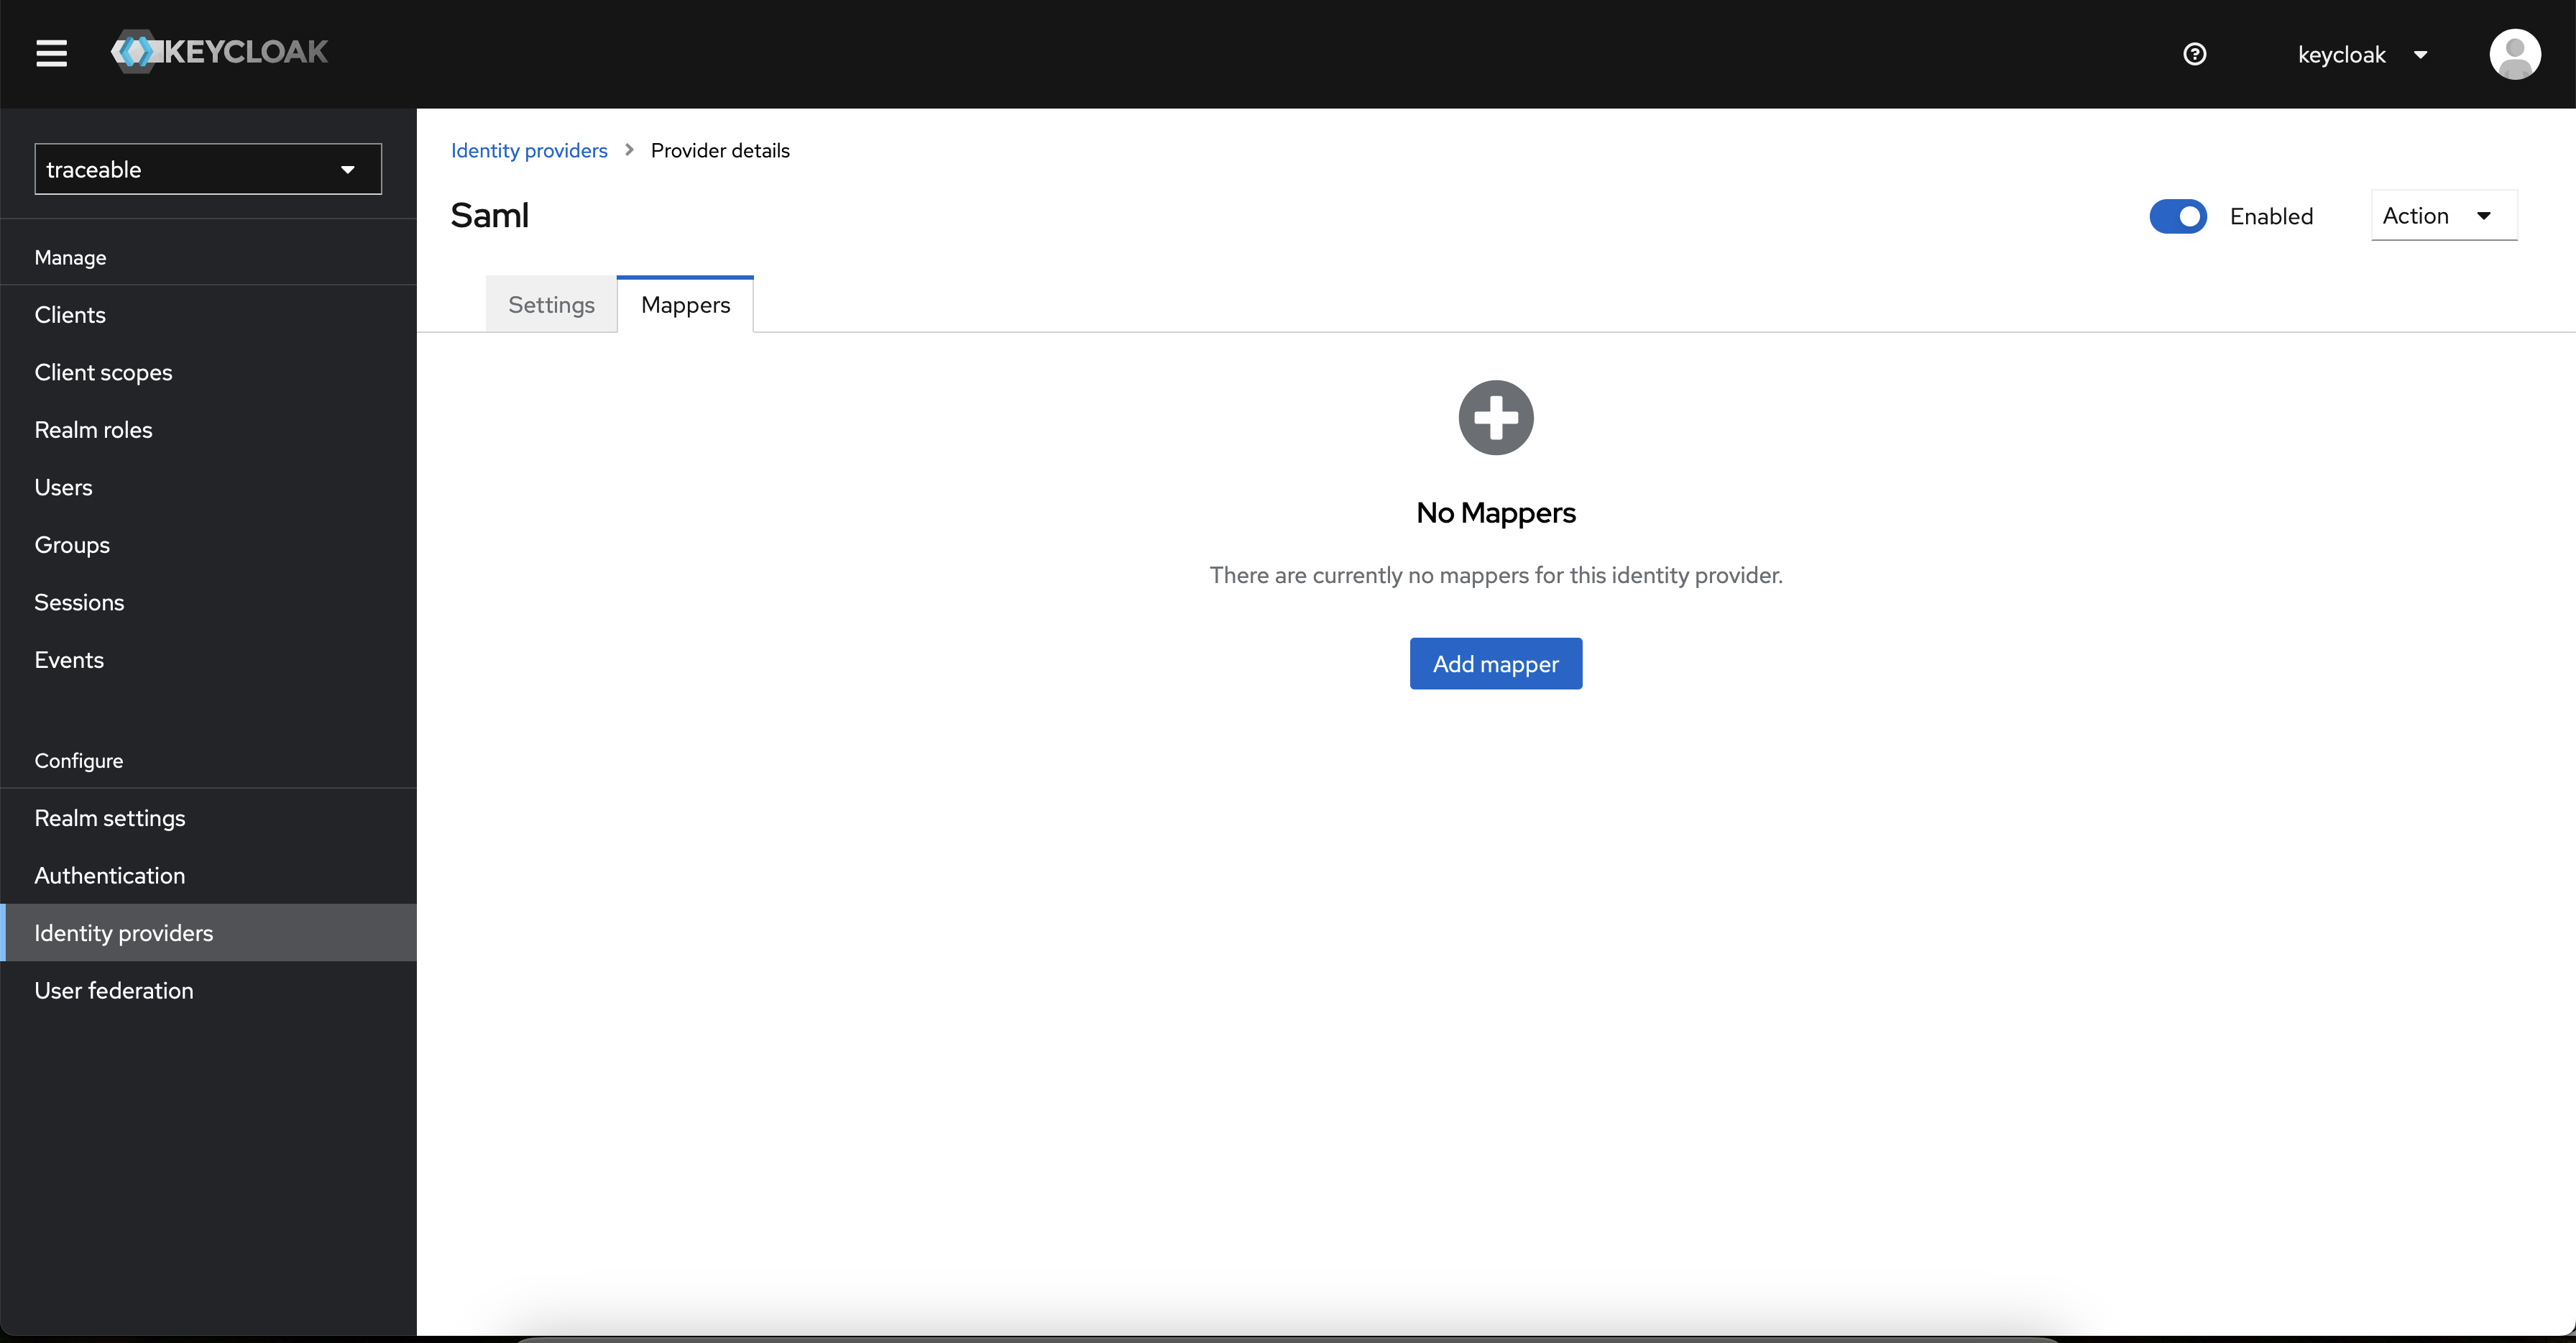
Mappers are used to map SAML attributes from the IDP to Keycloak user attributes.
- Go to the Mappers tab
- Click on Add Mapper
10. Create Email Mapper
Enter the following details:
- Name:
email(can be any name of your choice) - Mapper type:
Attribute Importer - Attribute Name:
email(must match the attribute name defined in your SSO provider whose value is user.email) - User Attribute Name:
email(must be one of: email, lastName, firstName, groups)
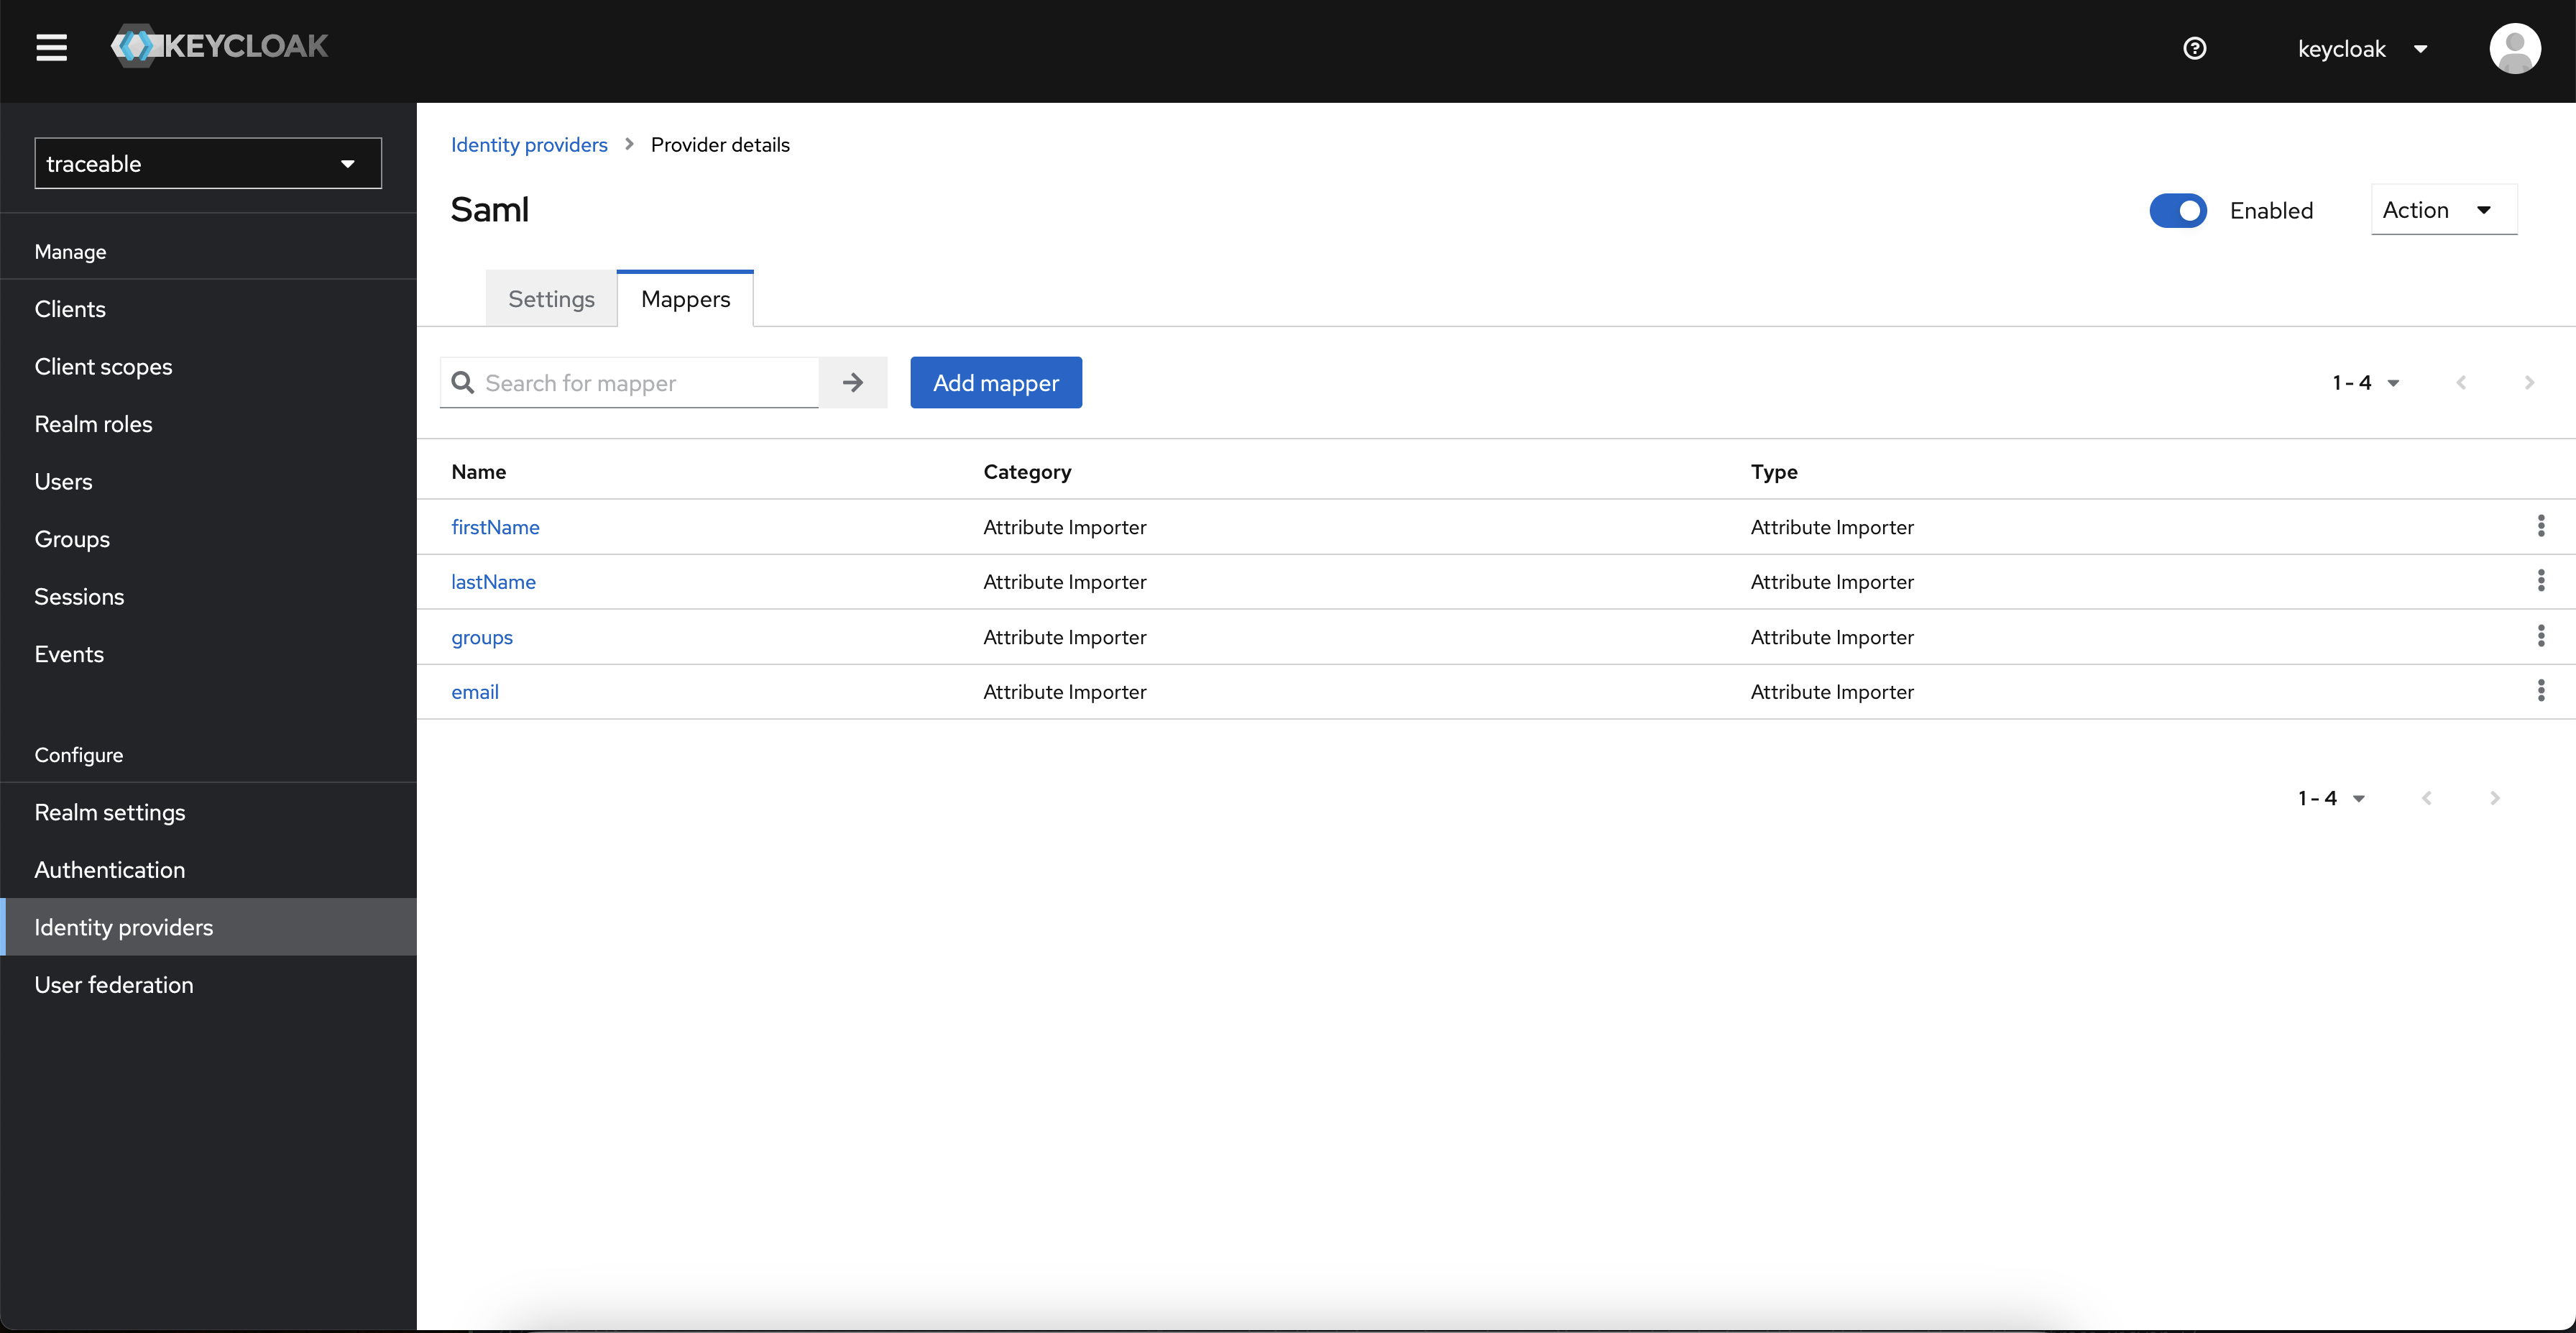
11. Create Additional Mappers
Repeat step 10 to create mappers for:
First Name Mapper:
- Name:
firstname - Mapper type:
Attribute Importer - Attribute Name:
firstName(or as defined in your IDP) - User Attribute Name:
firstName
Last Name Mapper:
- Name:
lastname - Mapper type:
Attribute Importer - Attribute Name:
lastName(or as defined in your IDP) - User Attribute Name:
lastName
Groups Mapper:
- Name:
groups - Mapper type:
Attribute Importer - Attribute Name:
groups(or as defined in your IDP) - User Attribute Name:
groups
Part 2: MongoDB Configuration
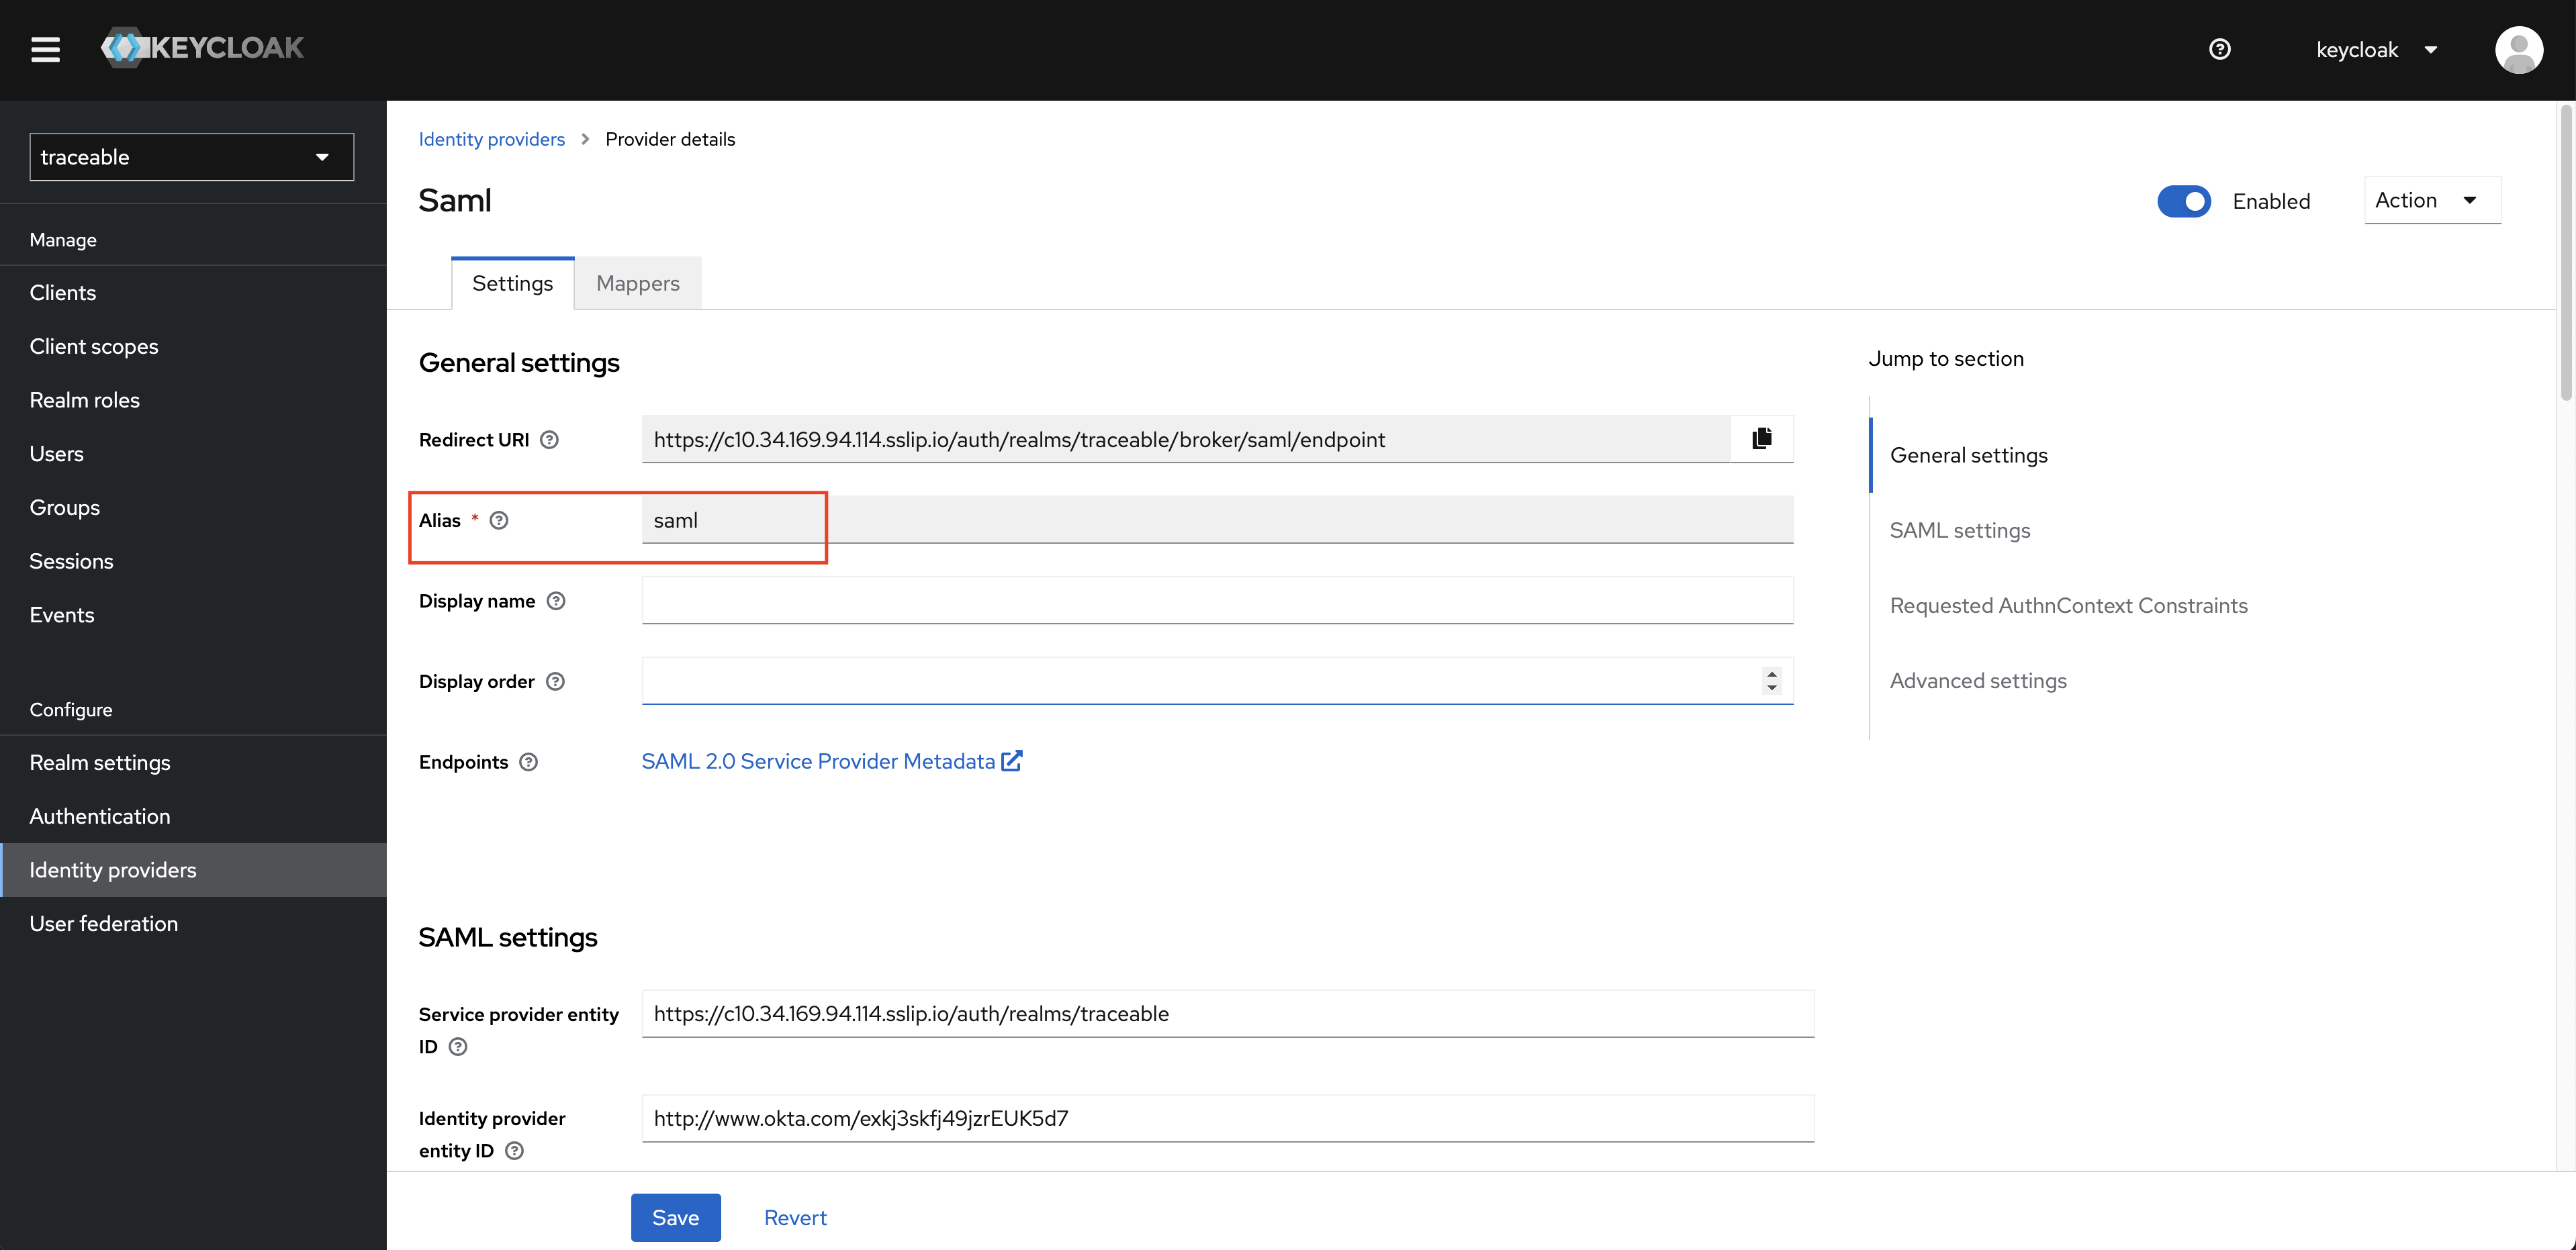
1. Get Connection ID
- In Keycloak, note the Alias of your SAML provider (usually
saml)
2. Access MongoDB Pod
- Login to the Traceable Operator (TI)
- Go to Traceable Pods
- Filter by MongoDB
- Exec into the mongo-primary pod
3. Connect to MongoDB
Enter the MongoDB shell:
4. Update Tenant Configuration
Add the connection ID to the tenant object:
use default_db;

const tenantIds = db.iamv2.tenants.find(
  { "object.accountOwner.title": { $ne: "Traceable" } },
  { tenantId: 1, _id: 0 }
).map(doc => doc.tenantId);

tenantIds.forEach(id => {
  db.iamv2.tenants.updateOne(
    {
      "tenantId": id,
      "object.authConfigurations.samlAuth": { $exists: true }
    },
    {
      $set: {
        "object.authConfigurations.samlAuth.connectionIds": ["saml"]
      }
    }
  );
});
Note: Replace "saml" with the actual Alias from Keycloak if different.
5. Validate Configuration
Verify the update was successful:
Look for the samlAuth section with connectionIds: ["saml"].
Part 3: Platform Configuration
1. Configure SAML Group Mapping
To enable RBAC (Role-Based Access Control) with SAML groups:
- Login to the Traceable Platform UI
- Navigate to Settings → Authentication → SAML
- Add SAML Group mapping
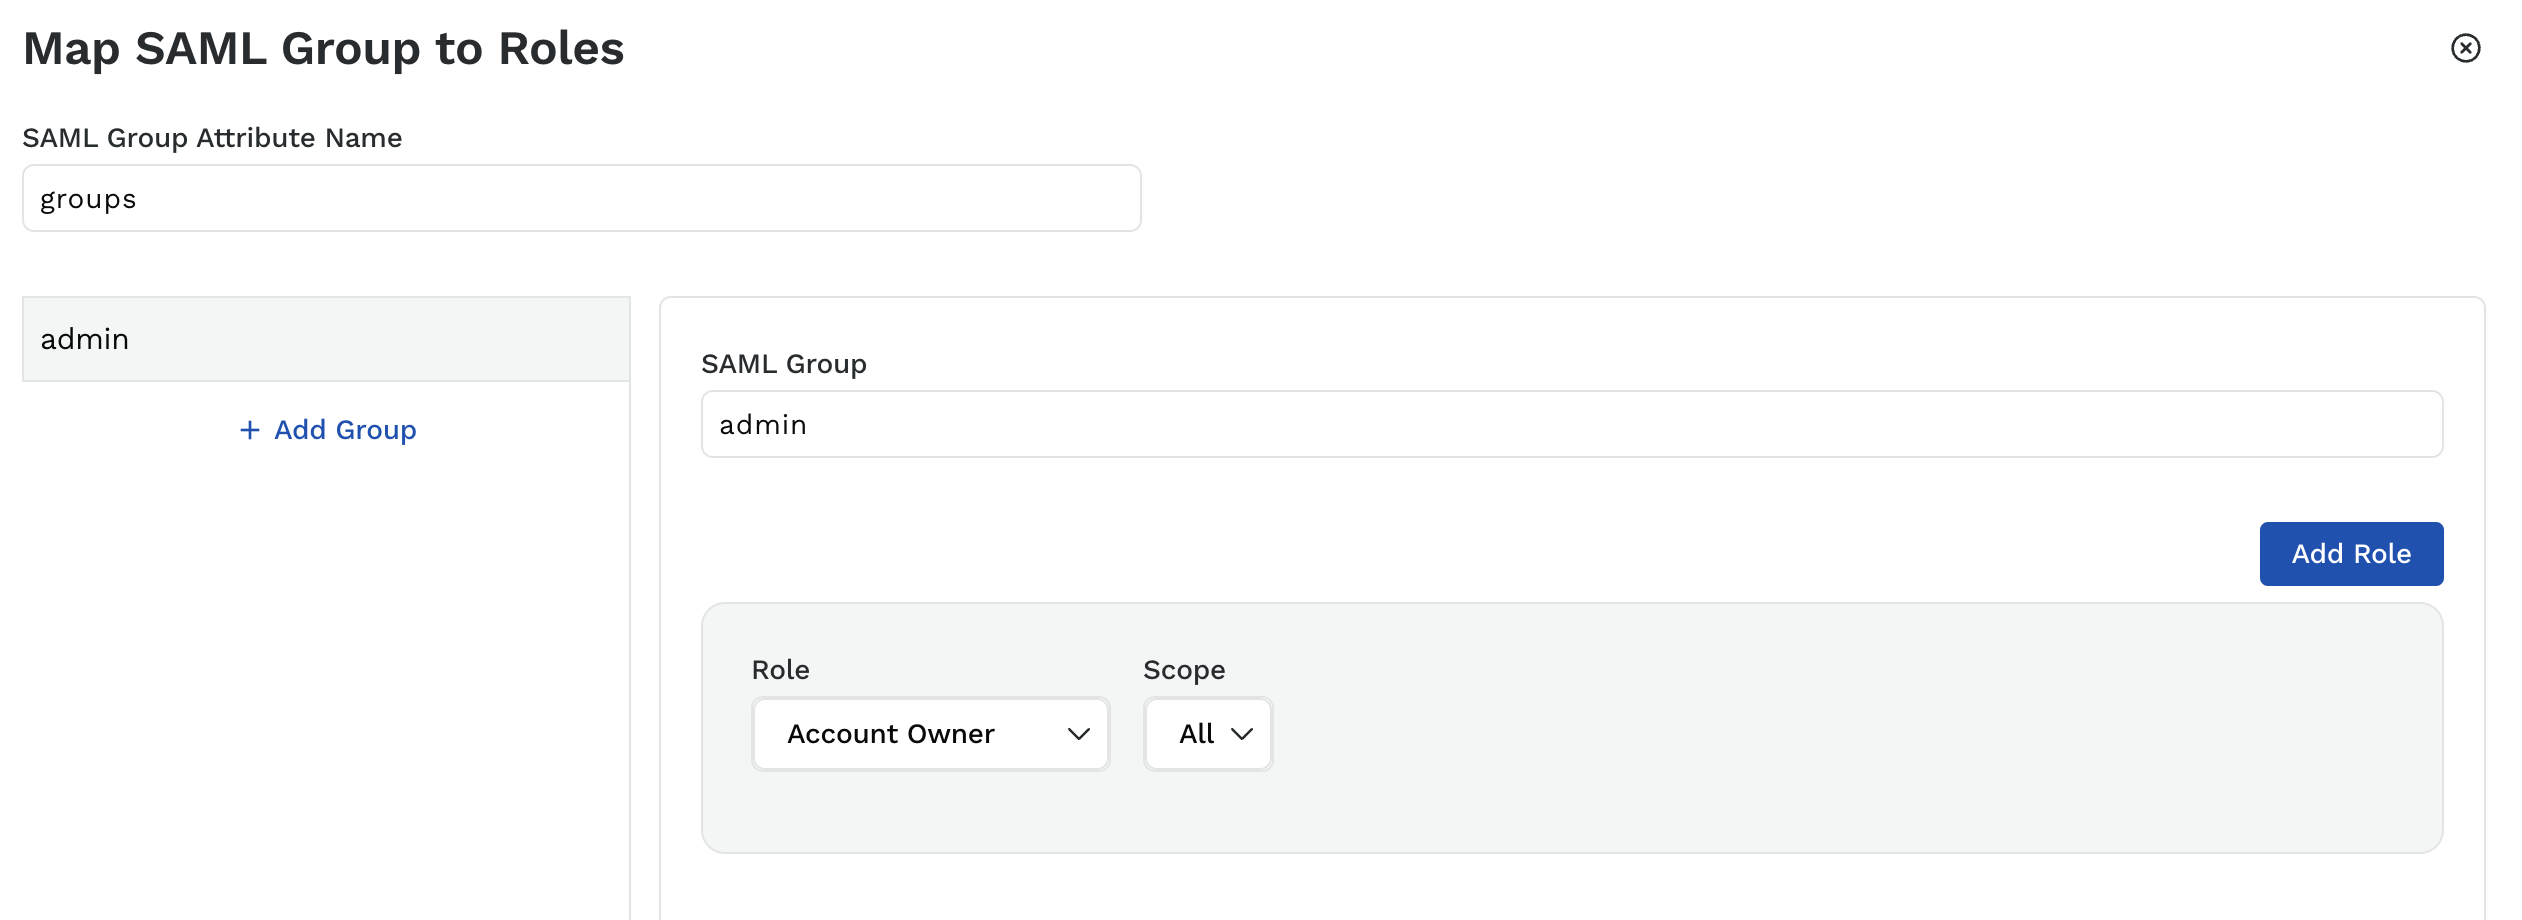
Important: Make sure the SAML Group attribute Name is set to groups.
2. Map SAML Groups to Roles
Create mappings between SAML groups and Traceable roles:
| SAML Group | Traceable Role |
|---|---|
| traceable-admins | Admin |
| traceable-developers | Developer |
| traceable-viewers | Viewer |
Verification
Test SAML Login
- Logout from the Traceable Platform
- On the login page, click Sign in with SAML
- You should be redirected to your Identity Provider
- Login with your IDP credentials
- You should be redirected back to Traceable Platform and logged in
Verify User Access
- Check that the user is logged in with the correct name and email
- Verify the user has the appropriate role based on their SAML group membership
- Test accessing resources based on the assigned role
Troubleshooting
Issue 1: Asking for Update Account Information
Symptoms: After logging in using SAML, the platform asks for update account information including Name and other details.
Causes:
- Mappers are not configured correctly in Keycloak
- SAML response doesn't contain required attributes
Solutions:
- Check mappers in Keycloak (verify all four mappers: email, firstName, lastName, groups)
- Check the SAML response in the browser network tab:
- Look for the call to
auth/realms/traceable/broker/saml/endpoint - Verify all attributes are being returned in the response
- Look for the call to
Issue 2: Getting Error Request ID when using IAMv2
Symptoms: Error message with Request ID displayed after SAML login.
Causes:
connectionId=samlis not set undersamlAuthforiamv2.tenantscollection
Solutions:
- Check MongoDB tenant configuration:
- Verify
connectionIdsis set correctly undersamlAuth - Check IAMv2 logs for detailed error:
Expected Error in Logs:
2025-03-05 18:05:25.883 [grpc-default-executor-134] WARN  a.t.i.i.i.s.LoginCallbackHandler - Error in login callback for user: user@example.com, errorId: 734fdfe7-fcdf-4002-8574-8ae4c5f2bea4 with errorDescription: null
ai.traceable.iam.auth.provider.LoginException: No relevant tenant to be added
Issue 3: RBAC Not Working (New Users Always Logged in as Developer)
Symptoms: All new SAML users are assigned the Developer role regardless of their group membership.
Diagnosis Steps:
Check SAML Response
- Open browser developer tools (F12)
- Go to Network tab
- Login via SAML
- Find the call to
auth/realms/traceable/broker/saml/endpoint -
Check the SAML response
-
Decrypt the SAML response to check if the groups attribute is set:
-
Look for
AttributeValuecontaining group information
Solutions:
Solution A: Standard Groups Attribute
If groups are coming with a standard attribute name:
- Verify the mapper in Keycloak has Attribute Name matching what's in the SAML response
- Verify User Attribute Name is set to
groups - Check Platform SAML Group Mapping configuration
Solution B: Custom Groups Attribute
If groups attribute has a different name (e.g., http://schemas.microsoft.com/ws/2008/06/identity/claims/groups):
Example SAML Response:
<Attribute Name="http://schemas.microsoft.com/ws/2008/06/identity/claims/groups">
  <AttributeValue>17075b20-1083-48ef-a967-7434580f82cc</AttributeValue>
</Attribute>
Fix:
- Update the mapper's Attribute Name in Keycloak to match the full attribute name from SAML response
- Keep User Attribute Name as
groups
Issue 4: Certificate Validation Errors
Symptoms: SAML login fails with certificate errors in logs.
Solutions:
- Verify the X509 certificate in the SAML metadata is valid
- Check certificate expiration date
- Ensure certificate chain is complete
- If using self-signed certificates, configure Keycloak to trust them
Issue 5: Redirect Loop
Symptoms: Browser gets stuck in a redirect loop between Traceable and IDP.
Solutions:
- Verify the Redirect URI in IDP matches exactly what's configured in Keycloak
- Check for trailing slashes or protocol mismatches (http vs https)
- Clear browser cookies and cache
- Check Keycloak logs for redirect errors
Advanced Configuration
Multiple SAML Providers
To configure multiple SAML providers:
- Create additional SAML identity providers in Keycloak with different aliases
- Update MongoDB tenant configuration with multiple connection IDs:
- Configure separate group mappings for each provider in the Platform
Custom Attribute Mapping
For additional custom attributes:
- Create new mappers in Keycloak
- Set Mapper type to
Attribute Importer - Define custom User Attribute Name
- Access custom attributes in Platform via user profile
Just-In-Time (JIT) User Provisioning
SAML users are automatically provisioned on first login. To customize:
- Configure default role assignment in Platform settings
- Set up automatic group membership based on SAML attributes
- Define user profile defaults
Security Best Practices
- Use HTTPS: Always use HTTPS for SAML endpoints
- Sign Assertions: Enable assertion signing in your IDP
- Encrypt Assertions: Enable assertion encryption for sensitive data
- Validate Certificates: Always validate SAML certificates
- Rotate Certificates: Regularly rotate SAML signing certificates
- Audit Logs: Monitor SAML login attempts and failures
- Session Timeout: Configure appropriate session timeouts
- MFA: Enable Multi-Factor Authentication at the IDP level
SAML Attribute Reference
Required Attributes
| Attribute Purpose | SAML Attribute Name | Keycloak User Attribute | Required |
|---|---|---|---|
| Email Address | email (or custom) | Yes | |
| First Name | firstName (or custom) | firstName | Yes |
| Last Name | lastName (or custom) | lastName | Yes |
| Groups | groups (or custom) | groups | Yes (for RBAC) |
Debugging Tips
Enable Debug Logging
Keycloak:
kubectl exec -it <keycloak-pod> -n <traceable-namespace> -- bash
# Edit standalone.xml to enable SAML debug logging
IAMv2:
Decode SAML Response
Use online tools or browser extensions to decode SAML responses:
- SAML-tracer (Firefox/Chrome extension)
- https://www.samltool.com/decode.php
Check Network Connectivity
Verify connectivity between Keycloak and IDP:
kubectl run -it --rm debug --image=nicolaka/netshoot --restart=Never -- curl -v https://idp.example.com/metadata
Support
For SAML configuration assistance or issues, contact: support@harness.io
Provide the following information when requesting support:
- SAML provider (Okta, Azure AD, ADFS, etc.)
- Keycloak logs
- IAMv2 logs
- SAML response (with sensitive data redacted)
- Screenshots of configuration
- Error messages and request IDs